Microsoft Dynamics Business Central
Description
Microsoft is a software corporation that develops, manufactures, licenses, supports, and sells a range of software products and services.
Connector Details
| Name | Value |
|---|---|
| Platform | Microsoft Dynamics Business Central |
| Auth Type | OAuth |
| Direction | Bidirectional |
Supported Data
See the table below for the list of data you can read with the Microsoft Dynamics Business Central connector.
| Table Name | Fields |
|---|---|
| companies | id, systemVersion, name, displayName, businessProfileId, systemCreatedAt, systemCreatedBy, systemModifiedAt, systemModifiedBy |
| company_information | id, displayName, addressLine1, addressLine2, city, state, country, postalCode, phoneNumber, faxNumber, email, website, taxRegistrationNumber, currencyCode, currentFiscalYearStartDate, industry, picture@odata.mediaReadLink, lastModifiedDateTime |
| items | id, number, displayName, type, itemCategoryId, itemCategoryCode, blocked, gtin, inventory, unitPrice, priceIncludesTax, unitCost, taxGroupId, taxGroupCode, baseUnitOfMeasureId, baseUnitOfMeasureCode, generalProductPostingGroupId, generalProductPostingGroupCode, inventoryPostingGroupId, inventoryPostingGroupCode, lastModifiedDateTime, picture, itemCategory |
| purchase_invoices | id, number, invoiceDate, postingDate, dueDate, vendorInvoiceNumber, vendorId, vendorNumber, vendorName, payToName, payToContact, payToVendorId, payToVendorNumber, shipToName, shipToContact, buyFromAddressLine1, buyFromAddressLine2, buyFromCity, buyFromCountry, buyFromState, buyFromPostCode, shipToAddressLine1, shipToAddressLine2, shipToCity, shipToCountry, shipToState, shipToPostCode, payToAddressLine1, payToAddressLine2, payToCity, payToCountry, payToState, payToPostCode, shortcutDimension1Code, shortcutDimension2Code, currencyId, currencyCode, orderId, orderNumber, pricesIncludeTax, discountAmount, discountAppliedBeforeTax, totalAmountExcludingTax, totalTaxAmount, totalAmountIncludingTax, status, lastModifiedDateTime, purchaseInvoiceLines |
| sales_invoices | id, number, externalDocumentNumber, invoiceDate, postingDate, dueDate, customerPurchaseOrderReference, customerId, customerNumber, customerName, billToName, billToCustomerId, billToCustomerNumber, shipToName, shipToContact, sellToAddressLine1, sellToAddressLine2, sellToCity, sellToCountry, sellToState, sellToPostCode, billToAddressLine1, billToAddressLine2, billToCity, billToCountry, billToState, billToPostCode, shipToAddressLine1, shipToAddressLine2, shipToCity, shipToCountry, shipToState, shipToPostCode, currencyId, shortcutDimension1Code, shortcutDimension2Code, currencyCode, orderId, orderNumber, paymentTermsId, shipmentMethodId, salesperson, pricesIncludeTax, remainingAmount, discountAmount, discountAppliedBeforeTax, totalAmountExcludingTax, totalTaxAmount, totalAmountIncludingTax, status, lastModifiedDateTime, phoneNumber, email, salesInvoiceLines |
| vendor_purchases | vendorId, vendorNumber, name, totalPurchaseAmount, dateFilter_FilterOnly |
| vendors | id, number, displayName, addressLine1, addressLine2, city, state, country, postalCode, phoneNumber, email, website, taxRegistrationNumber, currencyId, currencyCode, irs1099Code, paymentTermsId, paymentMethodId, taxLiable, blocked, balance, lastModifiedDateTime |
Credentials Setup
Follow the steps below to get the credentials you need to use the Microsoft Dynamics Business Central connector.
The first thing that you need to do to get your Microsoft Dynamics Business Central credentials is to login to your Microsoft Dynamics Business Central dashboard. If you do not have a Microsoft Dynamics Business Central account, you can create learn how to create one here.
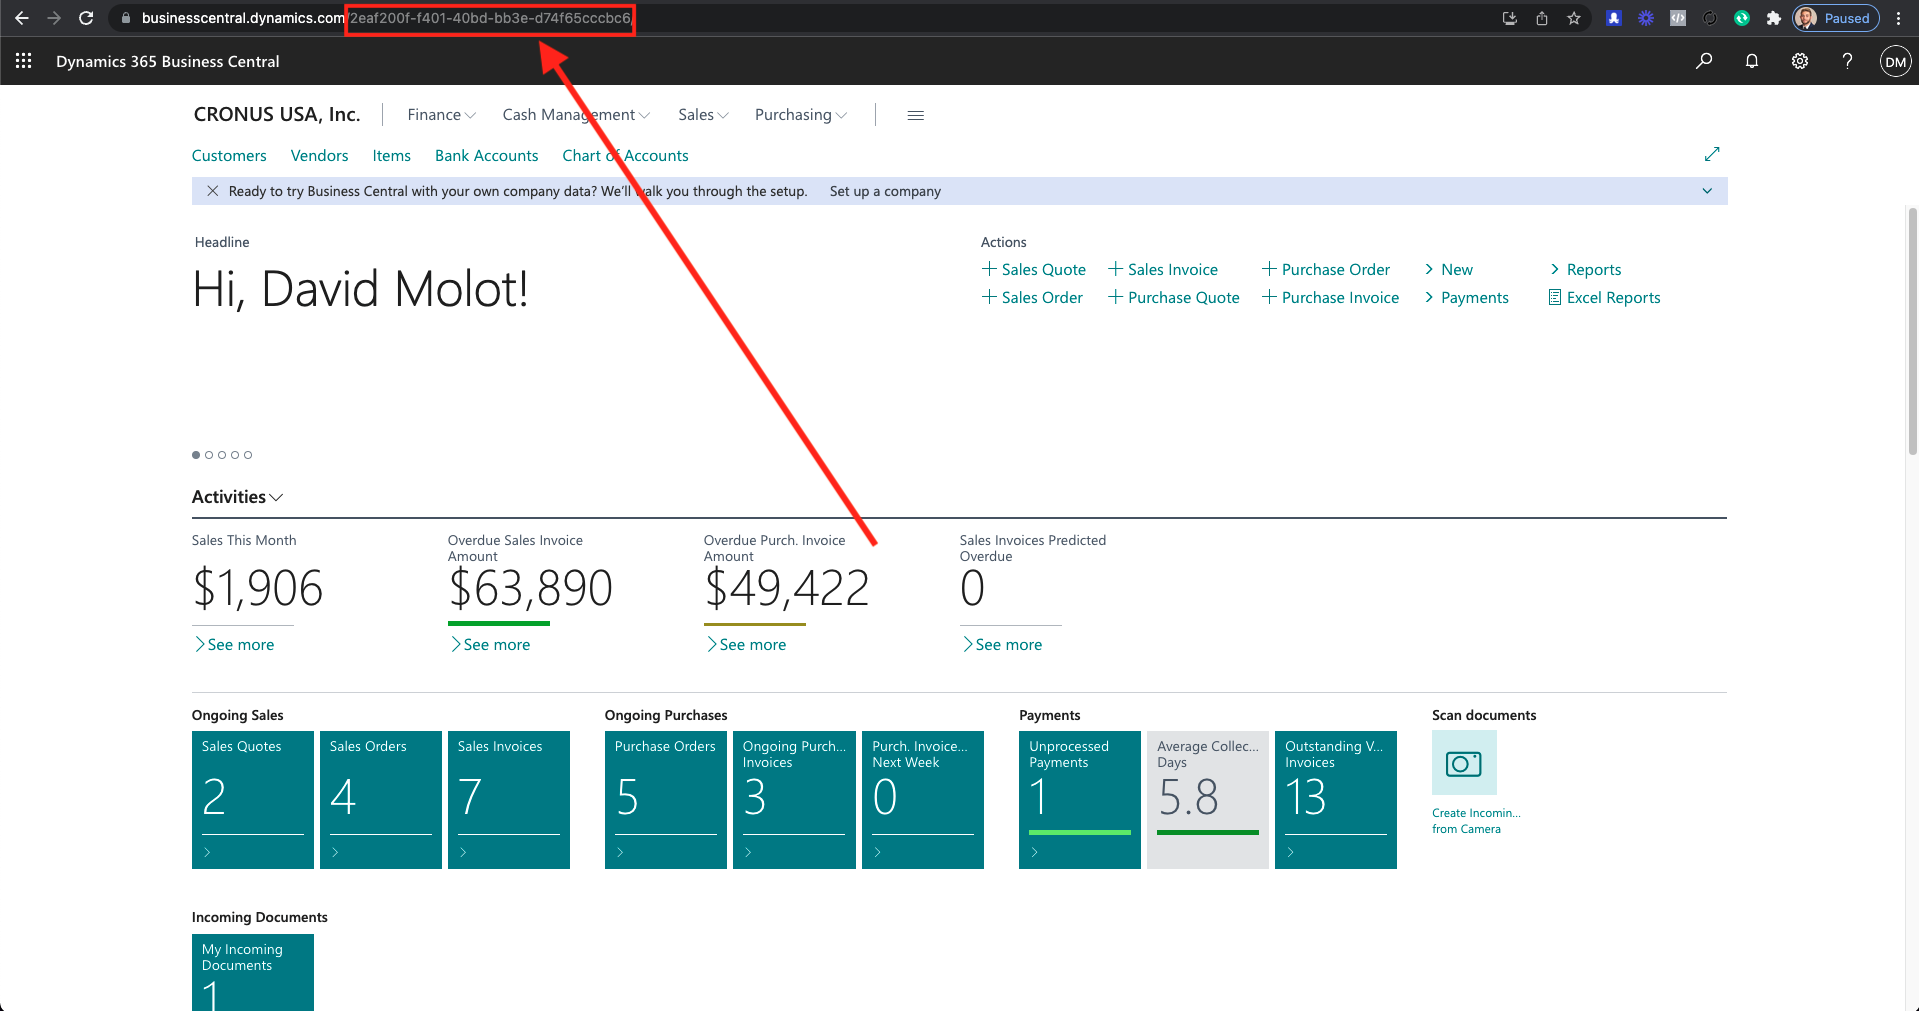
Once in your Microsoft Dynamics Business Central dashboard. The first thing you will need is to grab your Environment ID for Microsoft Dynamics. You can do that by looking the URL of the page and grabbing the highlighted section above. The URL is constructed as
businesscentral.dynamics.com/ENVIRONMENT-NAME
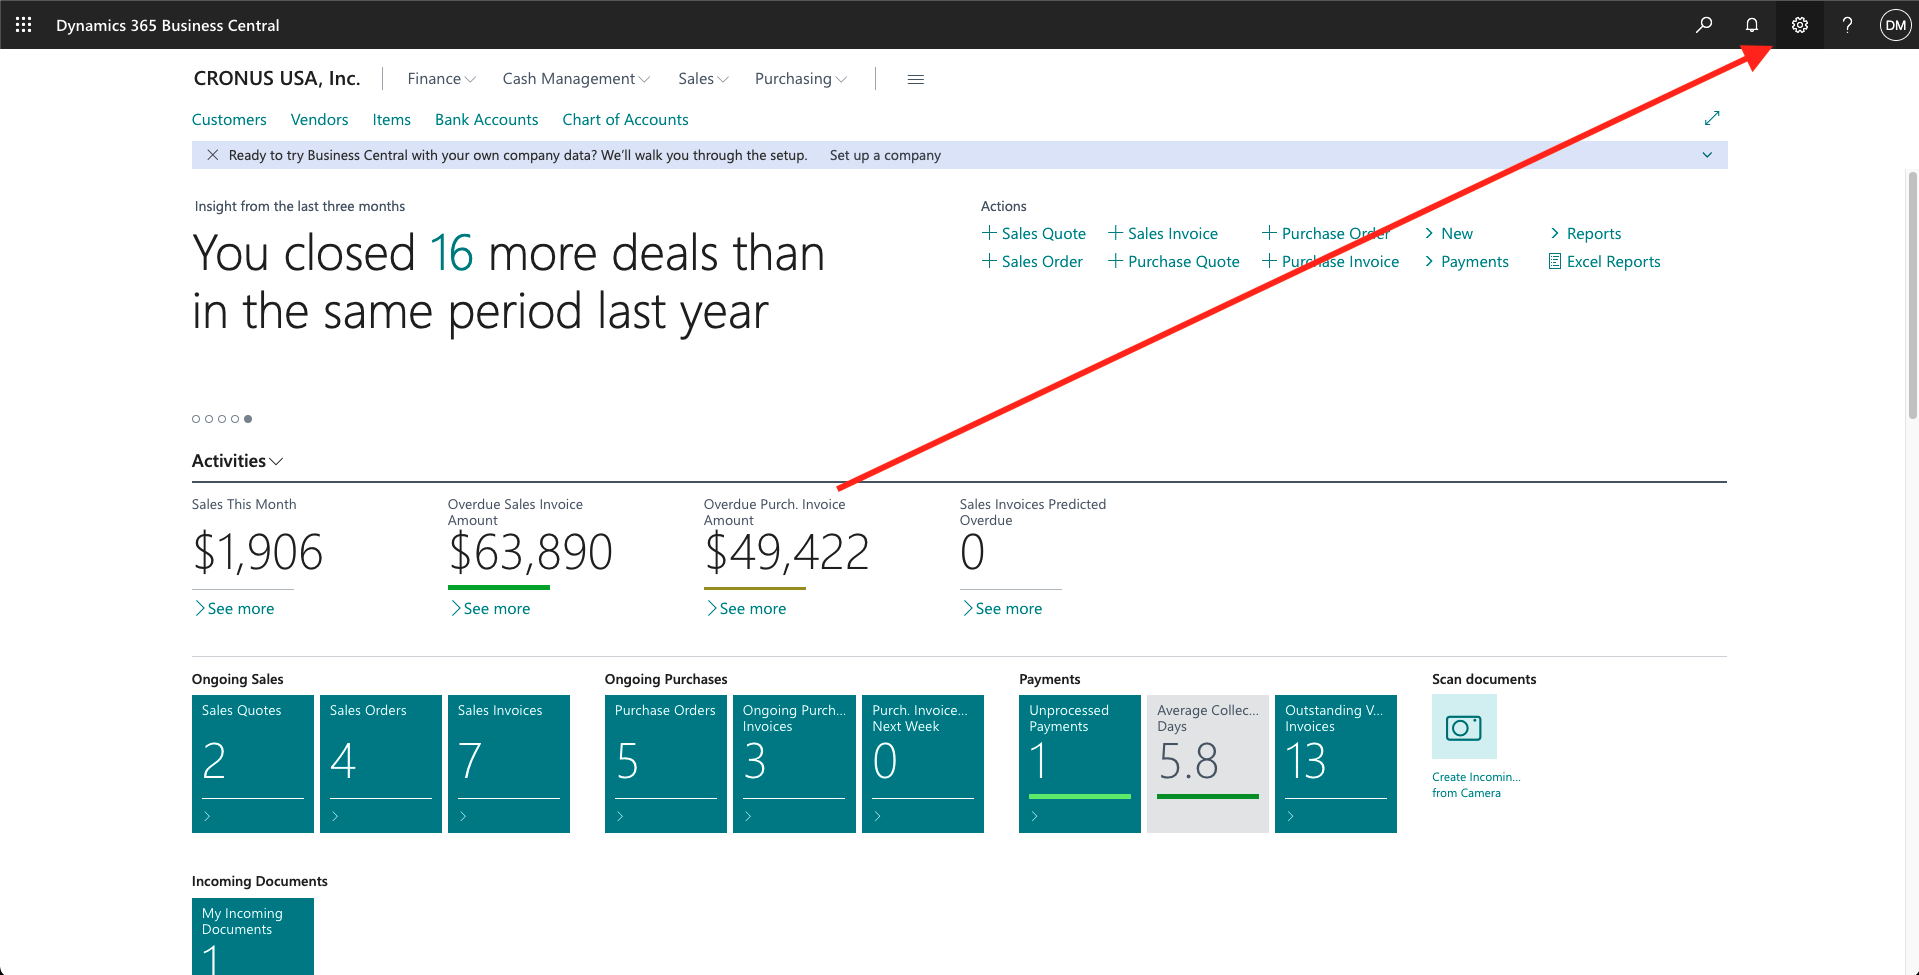
Next, you should click the Settings icon in the top right hand corner of the page.
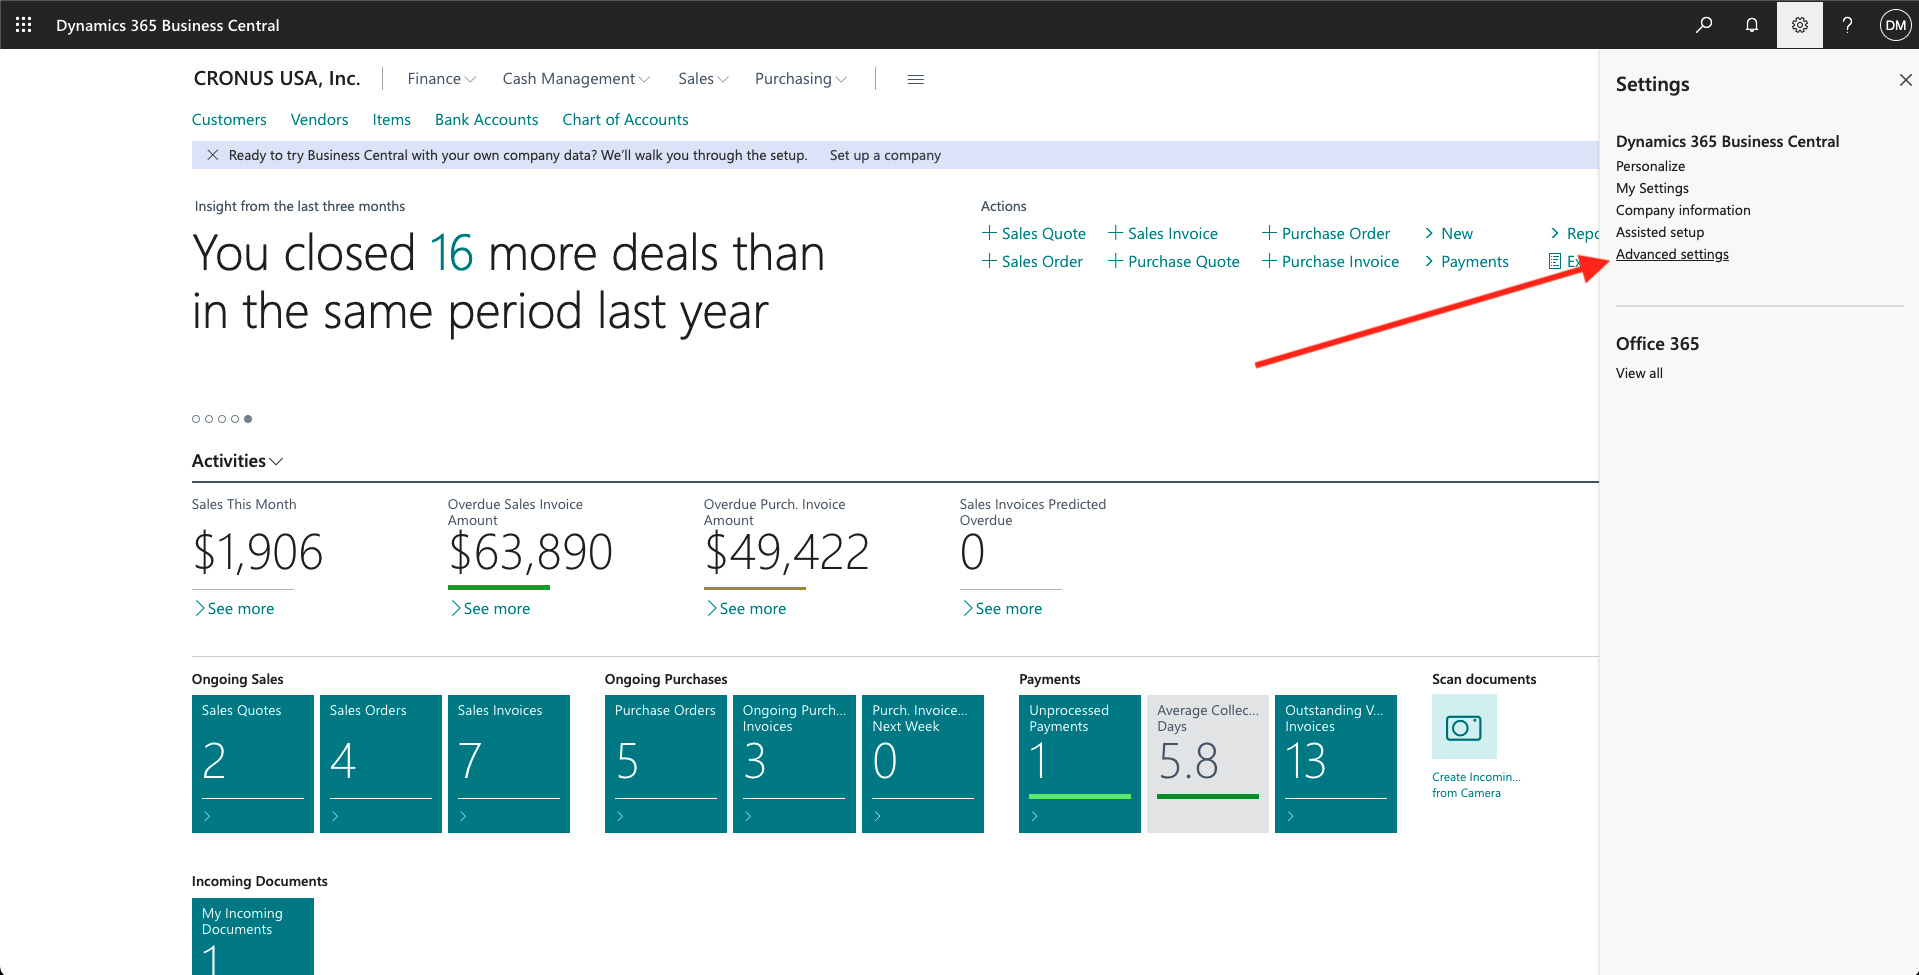
From the resulting dropdown, select the Advanced settings option.
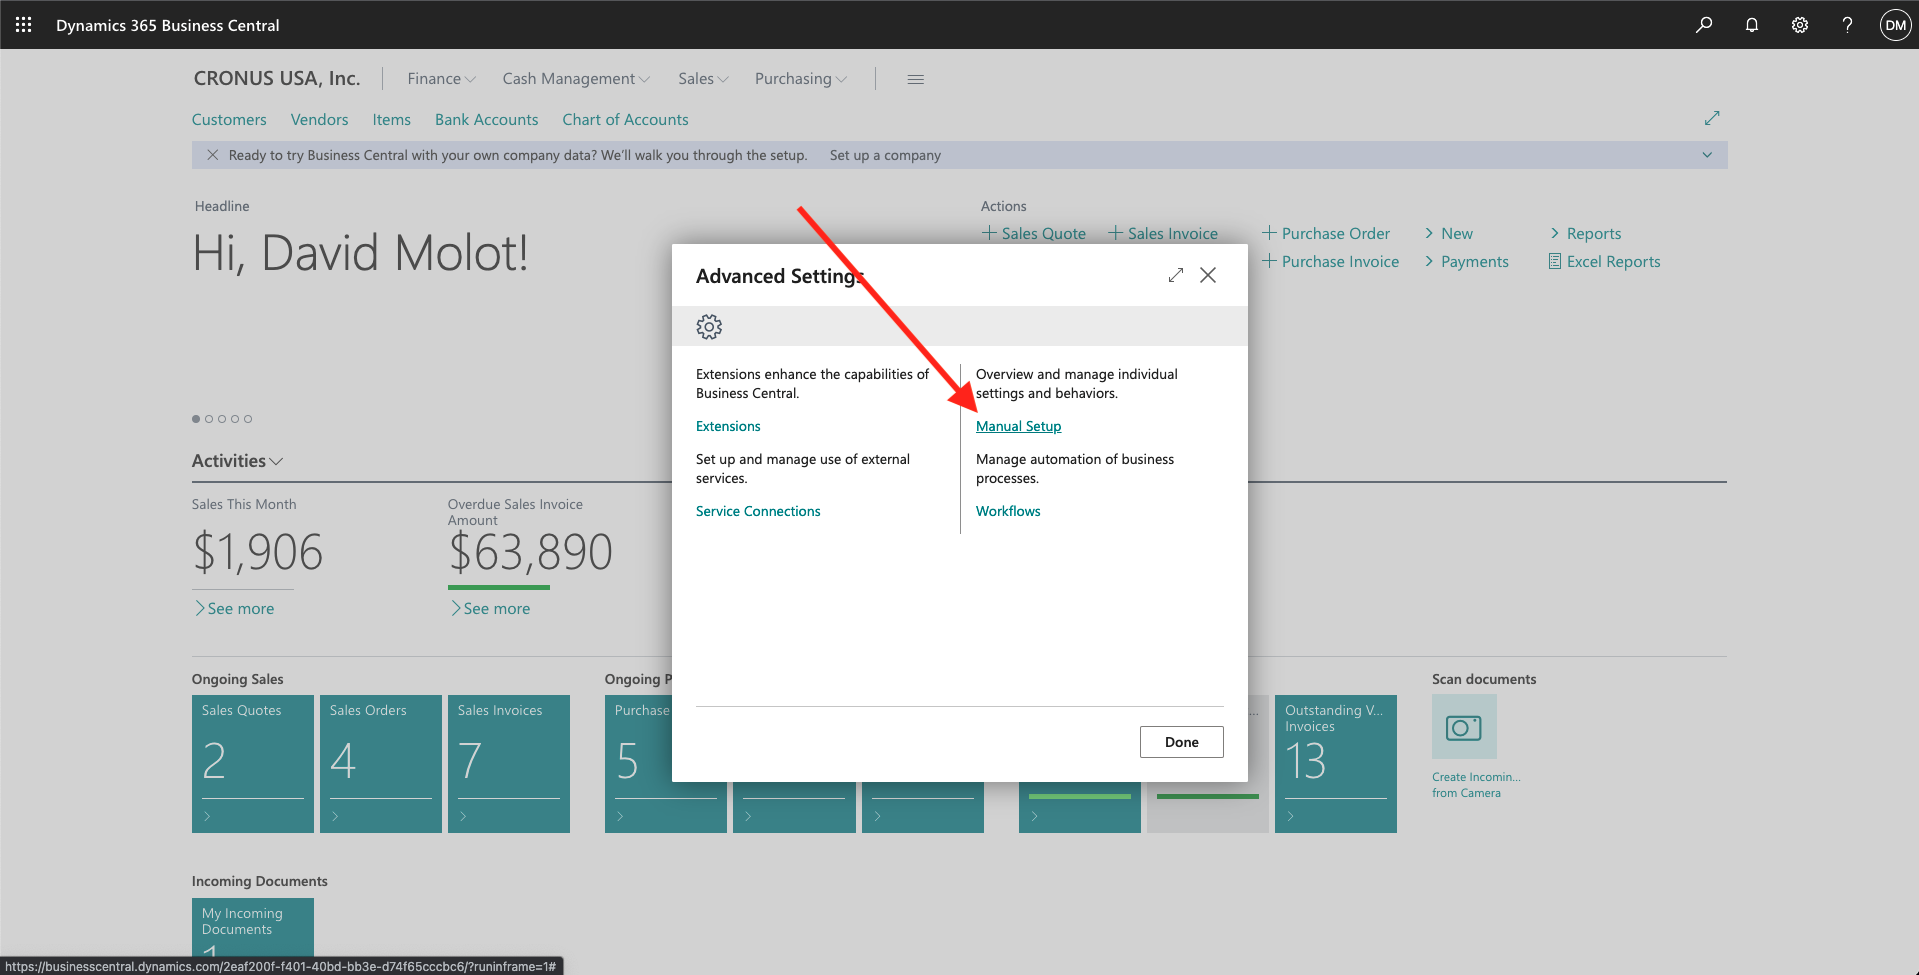
From the pop-up window, click on the Manual Setup option.
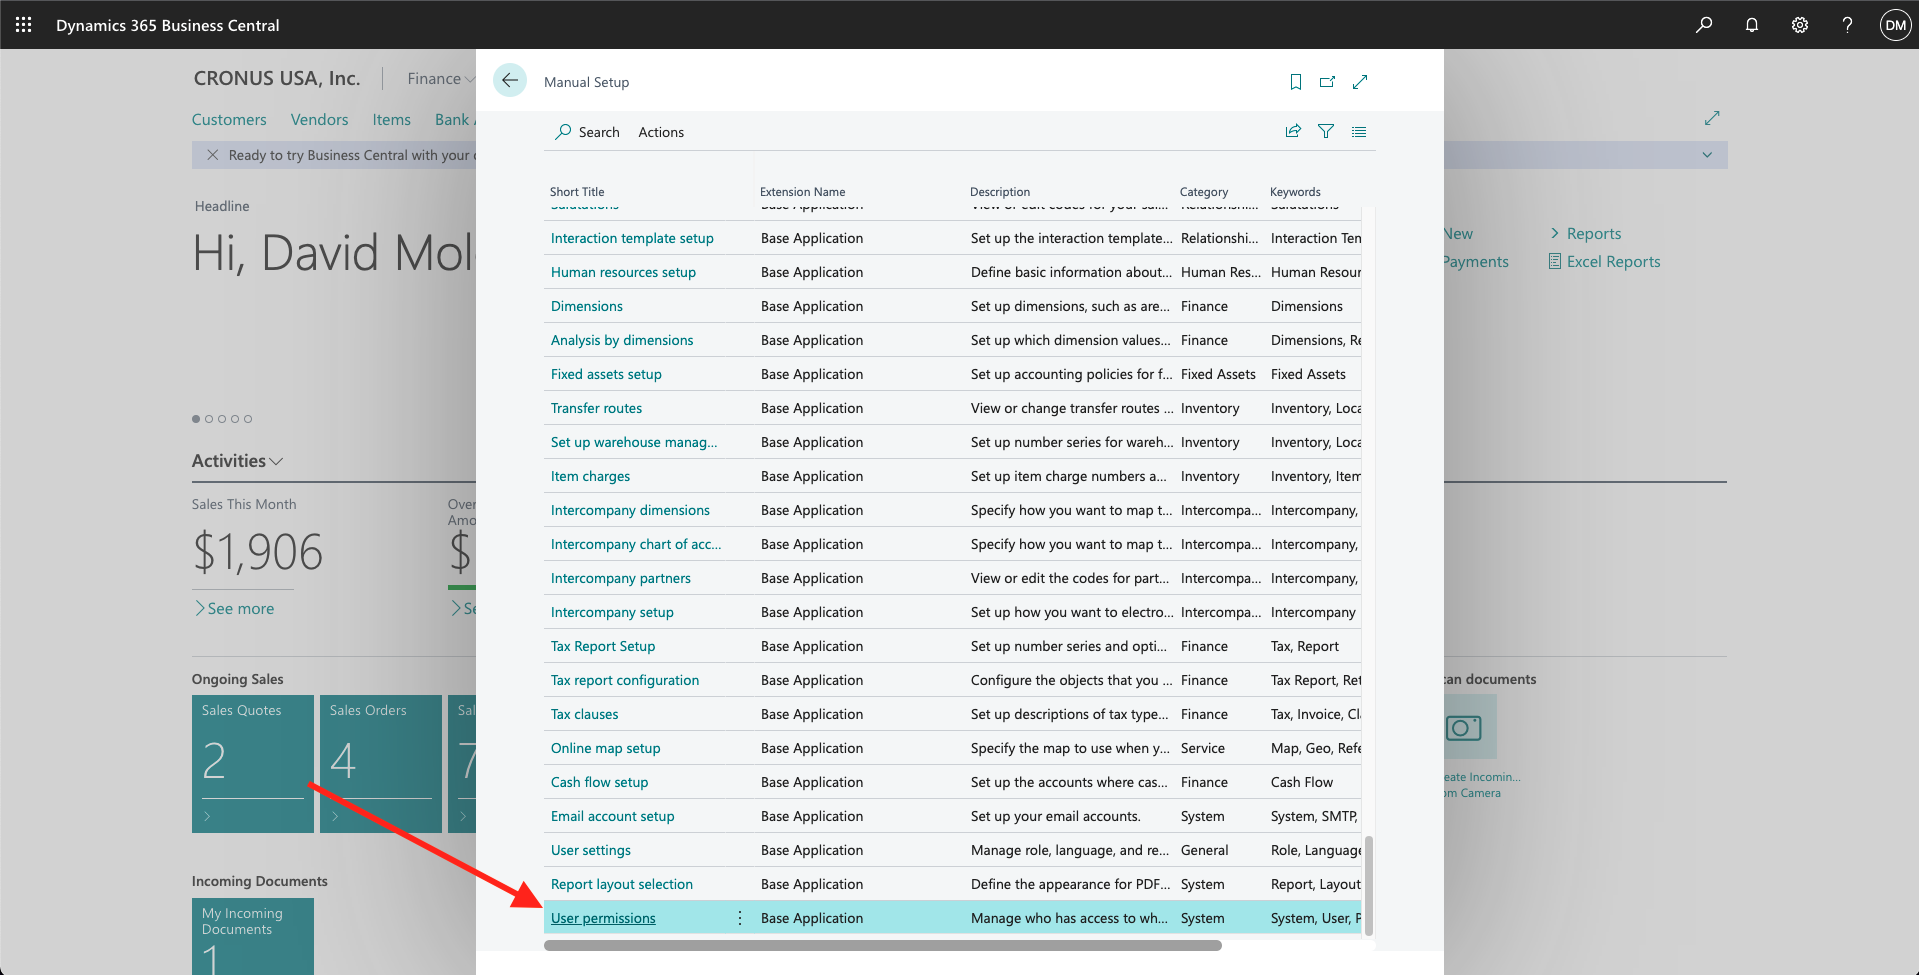
Then this page will appear. Make sure you head to the User permissions section and click on it.
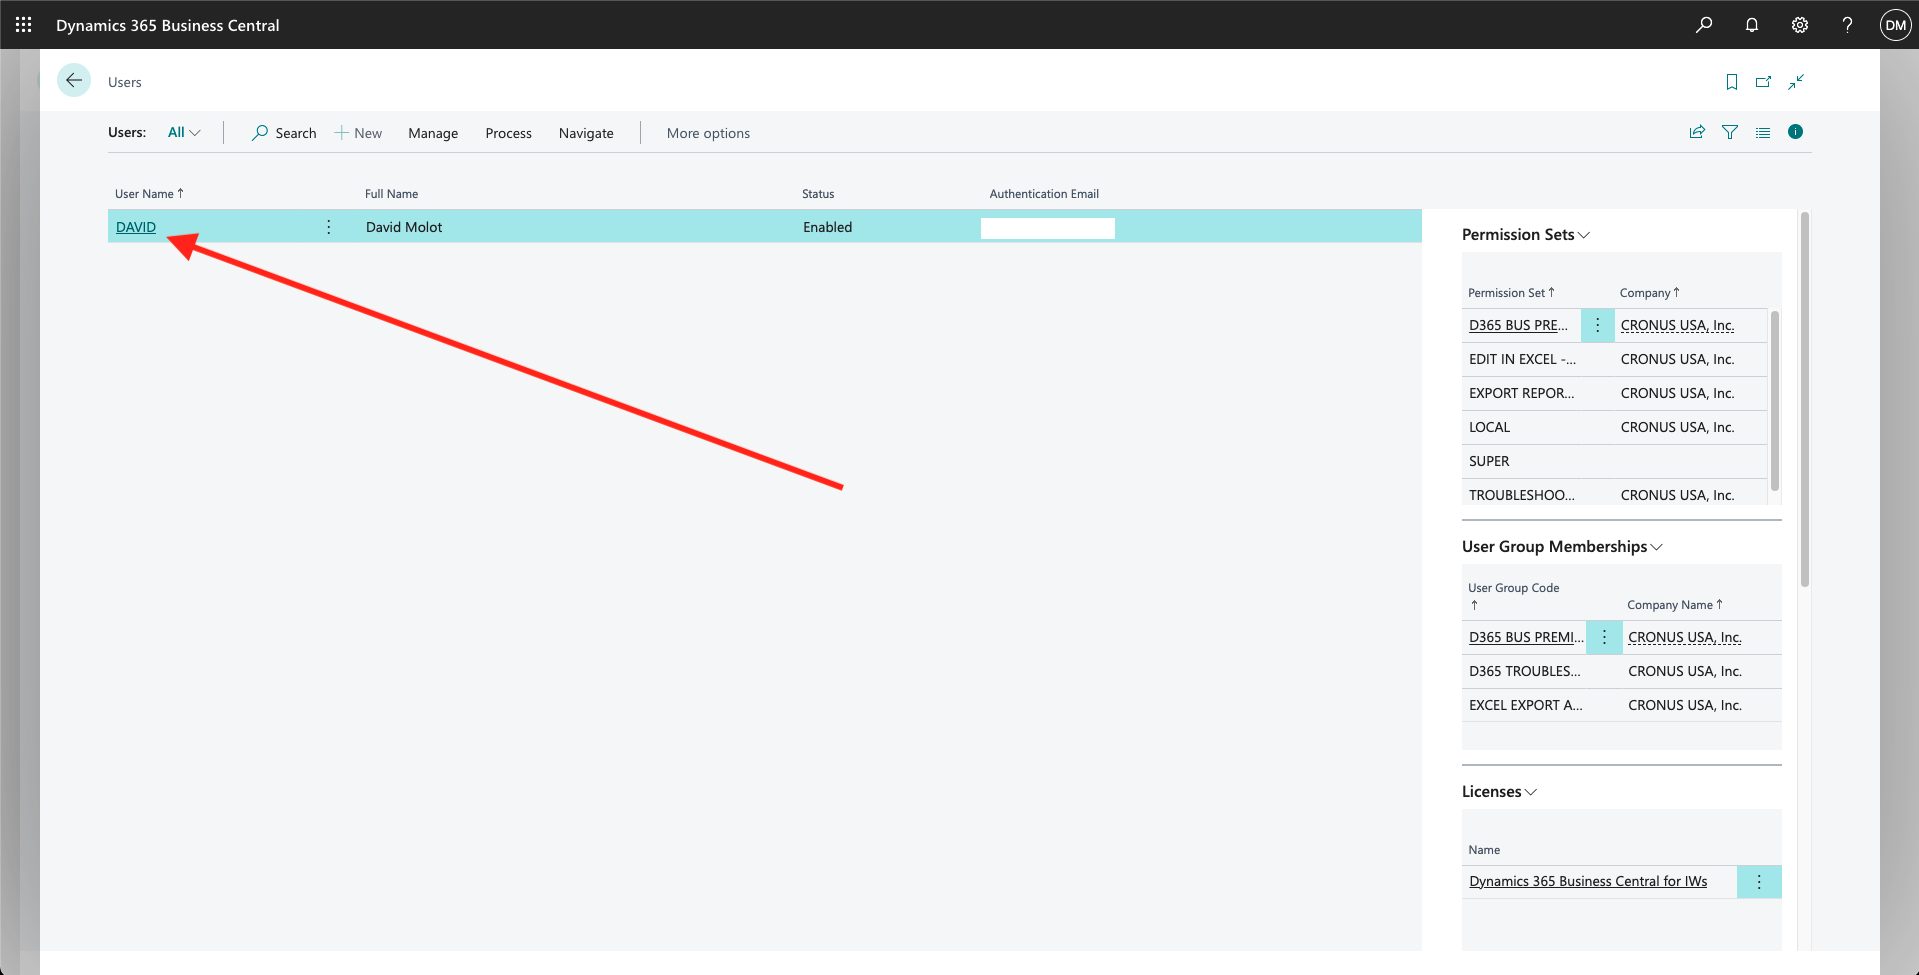
You will now be on the Users page. Go ahead and click on the User you want to have hotglue connect to. For example, I will go ahead and connect the DAVID user so I will click on the DAVID User Name.
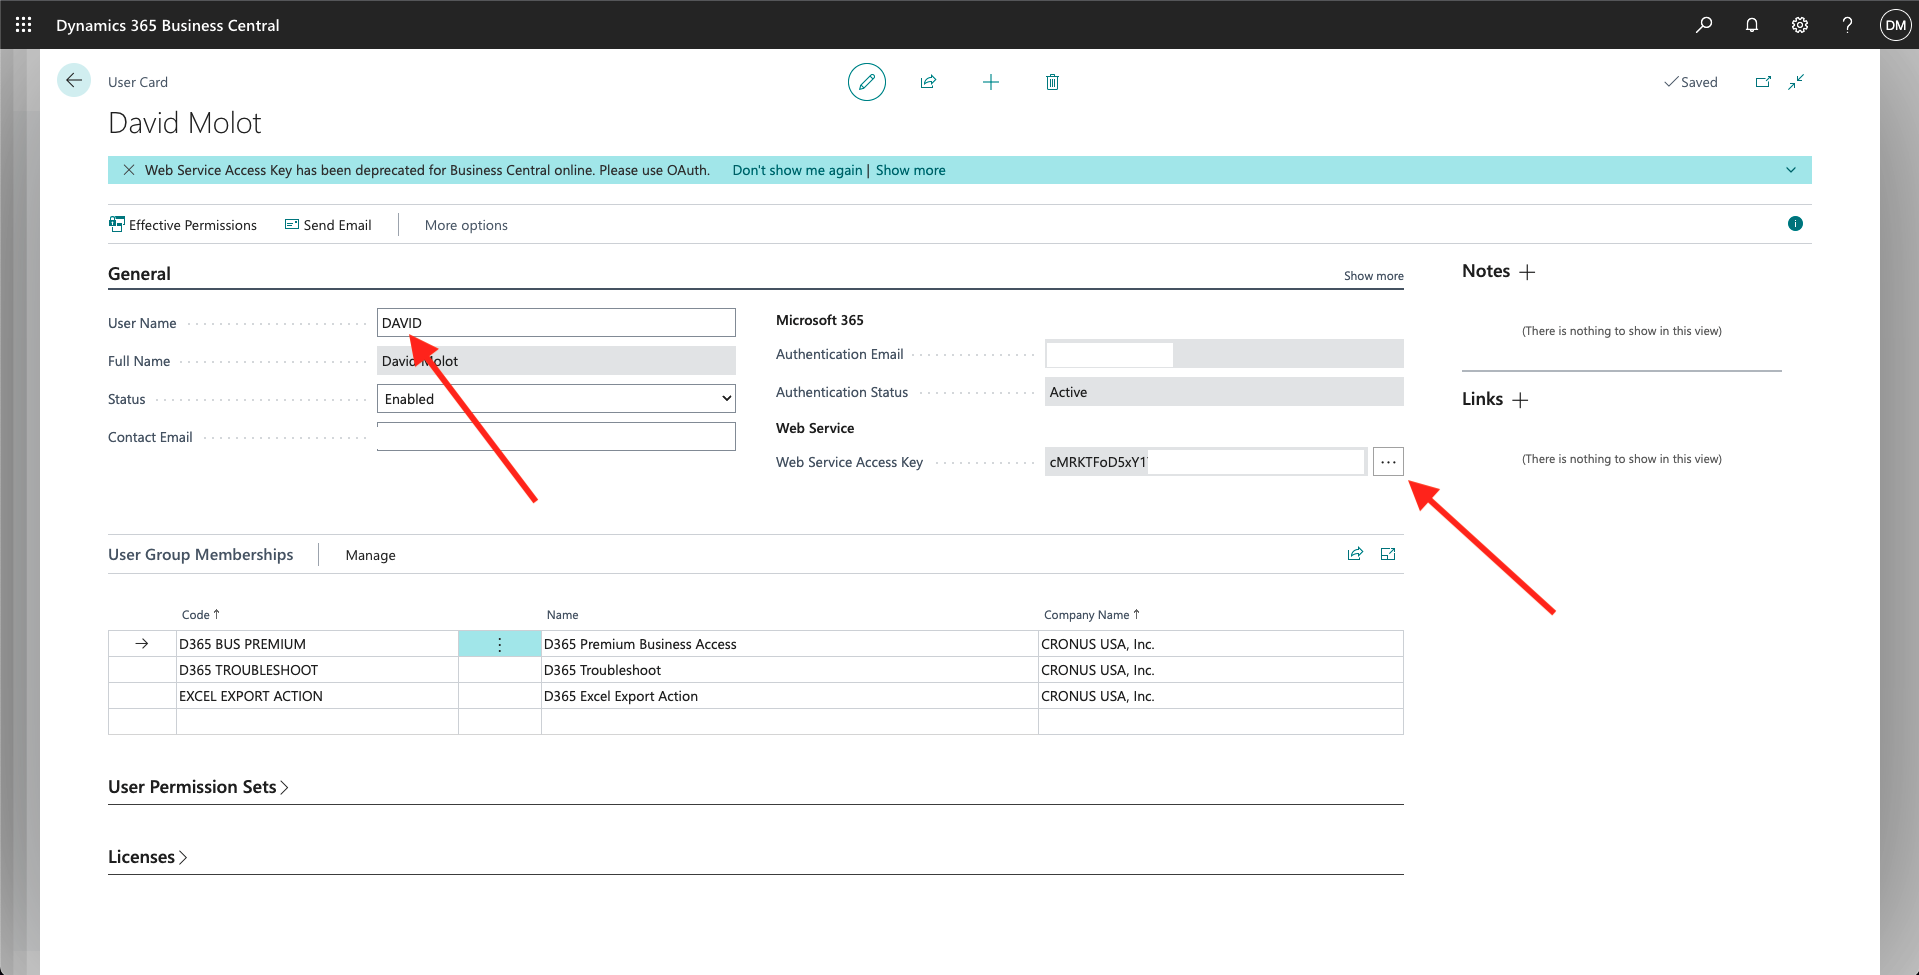
You now have your API Username as the first entry in the General section (in this case it would be DAVID). Now to get the Access Key, triple click on the access key to copy it. Paste this into hotglue and you are all set!

